Garlic Roasted Mushrooms

These would make a fabulous addition to any holiday table, I saw them a little while ago on Smitten Kitchen and since I haven't been eating any starch I have been eating a lot of mushrooms, there is something so satisfying about them, so delicious and these ones. Man. Oh. Man... I really wished that I could eat bread because the juices that were left at the bottom would have been so delicious enjoyed with some bread... however they were absolutely fantastic all by themselves though please feel free to top them onto Steak, Crostini, Chicken, Pasta anything you like!


I had some pretty huge mushrooms so I quartered them but you can halve them or leave them whole depending on the size you like. These were so simple, First I sprinkled them with salt and pepper then I drizzled them with a little bit of heavy cream, I then tossed them around so they were coated in the cream then I sprinkled them with chopped garlic and dotted the whole works with butter. Toss that into a 400 degree oven and roast until golden brown (I gave them a little stir around a couple of times to ensure even baking and that they were coated in garlic and butter and cream - pure decadence!)
Love,
Tiff

Chocolate Cherry Cheesecake

Last year for my birthday my handsome boyfriend surprised me with a home-made black forest cake, it was a little free form but it was so delicious, so when his birthday came around this year I wanted to surprise him with something similar - and more importantly something wheat free so I could enjoy it too! So I made what I call a black forest cheesecake - here is what it looks like....
please try not to drool... hahaha!


I created the same chocolate cake filled with cherries and when I served it I topped it with fresh whipped cream and a couple of maraschino cherries. This cheesecake was such a success... Several weeks ago I made a praline topped pumpkin cheesecake for a good friend but it disappeared so fast there was no photographing it! This one I made sure to be able to share it with all of you. This is rich - very rich I hoped that the cherries would cut through but they seemed to add to the chocolatey-ness and it kept it a little gooey in the center which I loved!
Perfect for a birthday celebration and would also make a fantastic addition to a holiday table.

Here is the recipe:

Crust:
2 Cups cookie crumbs (I used graham, but chocolate and ginger are also nice)
3 Tbsp melted butter

Cake:
3 packages of room temp Cream Cheese
1 bag of semi sweet Chocolate Chips
1 & 1/2 Cups Sugar
1/2 C Sour Cream
1 Tbsp Vanilla
4 Large Eggs
1 Can Cherry Pie Filling

Preheat the oven to 325 degrees

For the crust simply combine the cookie crumbs and the melted butter and press into the bottom of the pan and up the sides as you like. Bake it for 10 minutes, and remove the crust from the oven allowing it to cool.

Turn the oven up to 350 degrees

In the meantime I make the cake mix. 
For this recipe I used a food processor, but you could use a counter mixer, hand mixer or good old fashioned elbow grease. Begin by melting the chocolate, add the cream cheese and whip it until it is smooth, add the melted chocolate and combine, add the sugar, sour cream and vanilla, combine until it is all incorporated, then add eggs one at a time until they are combined, take as many opportunities to scrape down the sides as you need (using the food pro you need to do this often).
Poor 1/2 of the recipe into the cooled crust (mine wasn't very cooled, so there's no need to be to strict here) then I opened the can of cherries and carefully created a layer, I had to do so in little dabs as my cheesecake mixture was quite runny, you won't be able to smooth it so just add it in small dabs working your way around until there is a nice layer, while I was doing this I was sure that it was all going to sink to the bottom but as you can see by the picture it worked out pretty good!
Then pour the remaining batter on and bake it for an hour and 10 minutes. Allow to cool for an hour or 2 and then refrigerate for at least 4 hours or overnight.

I was a little overzealous and wanted to eat it after cooling on the counter for several hours, there was no way it was coming out of my spring form pan! (Which I seriously recommend for making cheesecakes and quiche too! Makes it so much easier to cut!)
Go ahead and make this right away!

Happy Holidays!
Love Tiff

Happy Holidays!

Its time to bake! And I have just been informed that I am allergic to starch. This means wheat, potatoes... just about all of the great holiday treats so I have been researching and bookmarking recipes that I can enjoy and while my baking hasn't yet began I wanted to share with you the recipes that I will be trying out very soon... probably this week or week end.


This allergy came about as a surprise to me, I knew that starches weren't good for people in general but hadn't realized that they were particularly bad for me, and my reaction was stranger then everyone elses.... my mom, my boyfriend they were all so worried that I couldn't eat this and that but I haven't really noticed or cared. I expected to feel deprived and left out but it seems that now I have a tangible excuse to not eat the foods that never made me feel very good, almost like more of a relief then a worry.... ofcourse when Christmas comes and I can't partake in mashed potatoes and stuffing that tune may change... we will have to wait and see!

Love,
Tiff

Octobers Golden Treasures


Chantrelle  Mushrooms are like little golden nuggets of goodness that pop up after a hot summer and a nice rain.  Not only are they beautiful but they are also scrumptious! Take a look!


I use them in Chantrelle Soup, which is a recipe I will have to share (although it really is like most other mushroom soup) and we also pickled some - which is a top secret recipe that I can not share. 


You do need to be careful when picking these gems because there are 'fake' chantrelles that disguise themselves as the real thing, you can always tell by the gills, the gills on the fake ones will always end in a nice neat line while the real ones have gills that stop unevenly like you can see above.  


Chantrelles have a very delicate flavor, I find that the best part is the texture, and I love to just gently fry these up with some butter, garlic, s&p. 
They would make a great accompaniment to any kind of protein, and last night I added them to stirfry.

More treats from my garden: Beets!

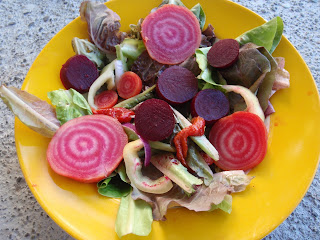
This year I bought 3 different types of beets for my garden, red, yellow and candy stripe. I opened all 3 packets and mixed them up then planted them so it would be a surprise, it seems as though my slimy enemies the slugs preferred the yellow for some reason but I was still able to procure some of the others. And let me tell you - they are Be - A - Utiful!


I boiled them until they were tender and added them to some farmers market greens, red onions, Hungarian peppers, roasted red peppers and then added a little crumbled blue cheese and a simple balsamic vinaigrette. Simple perfection!

Basil From My Garden!!


Look at this most beautiful abundance of Basil!!

Cool Caprese Salad

I just enjoyed a weeks holiday up through the Interior and Okanagan of BC and on my way home to Vancouver Island I had to stop and go the the Granville Island Market. It really is an amazing site, so much produce from all over the world, baked goods you wouldn't believe, crafts and my favourite the Italian Market where you can get the most amazing stuffed pastas like Feta and Black Olive Ravioli and Smoked Gouda Pouches, and my favorite marinated boconccini.... Swoon!!!


All you need to add are cherry tomatoes to these baby boconccini! Drizzle with a little of the olive oil that they are marinated in and add some fresh basil if you like and what an amazing summer salad. A perfect lunch or snack during those scorcher days that we've been having.

I also added a small drizzle of balsamic - it went a long way and added a little complexity!

Savoury Stuffed Eggplants

Wow! I can't believe how long it has been since I last posted a recipe. I am sorry, there really isn't a very good excuse. I haven't been cooking a lot and to be honest I haven't been feeling very inspired by life. I have been craving some ME time and it has me struggling with work and anything structured really. I just want to relax at the beach! Oh Wait! Maybe that is just Summer calling my name!!

Oddly enough I don't cook a lot despite the abundance of amazing produce around, I usually just eat a lot of fruit and what not in the summer. I did go to a market today though and soon I will share some photos of my garden which is slowly coming along.

This is a really easy and really tasty recipe that will make even the most skeptic people eggplant lovers!
Its kind of more of a method, as my measurements as you should know by now aren't the most accurate!


First I sliced 2 medium sized eggplants in half, then I sliced them into a cross hatch pattern through the flesh but leaving the skin intact (like you might cut an avocado before you scoop it out) then sprinkle in with salt and place it flesh side down on a cookie sheet for about 10 minutes. In the mean time dice a good sized onion fairly finely and begin to saute with some fresh thyme. A sprig or two, whatever suits you best! once the onion is softened add a diced tomato and reduce the heat add enough bread crumbs to hold this mixture together.  Before you add the tomatoes take the eggplants out of the oven and turn them over, let them roast with the squares facing up, this will allow them to open giving you lots of space to stuff the stuffing into, put back into the oven! Allow the stuffing to cool and add in about 100 grams of feta cheese crumbled (I bought a container that had 400 g, and I used about a quarter of it) You could add more or less if you like, then remove the eggplant from the oven once again and stuff the filling in to each nook and cranny and allow it to overfill, toss the whole lot back in the oven and allow the crumb mixture to get nice 'gratin-ed' and the eggplant to be nice and soft. All the flavors blend together and it is so good. I served it along side some 'raw' pasta aka julienne zucchini with pesto. 

Cheddar & Onion Pierogis


I'm not sure if there is anything more comforting then a big bowl of starchy goodness in the form of homemade pirogi. Add some sour cream and caramelized onions and you will slip into carb coma of contentment, or CCC as I fondly call it.

Well then, Lets Begin:


For the dough:

3-1/2 cups all-purpose flour, plus more for kneading and rolling
3 large eggs
2 tablespoons sour cream
3/4 to 1 cup water


For the insides:

1-1/2 lbs baking potatoes, peeled and cut into roughly 1 inch pieces
4 tablespoons unsalted butter
1 tablespoon extra-virgin olive oil
1 clove garlic,
1/4 teaspoon dried thyme
3/4 to 1 cup aged cheddar cheese
2 large onions
Salt and Pepper

I began by caramelizing the onions in 2 tbsp of the butter and a splash of water. I add just a bit of water, this helps the onion to cook evenly and become coated with the butter, by the time the water evaporates off the onions will already be translucent and ready to sweeten up! Once they look delicious to you remove from the heat and allow to cool.

At the same time I added the potatoes into pot of salted water and brought to a boil. Cook until fork tender and drain. Add the remaining ingredients except for the cheese and mash it all up! I like mine just a little chunky. Honestly, after I made this I almost didn't even make the wrappers. I almost ate them all as is. Next time I think I will do a double batch of just the filling!
The filling was pretty hot so I waited for it to cool before I added the cheese, I wanted more of a potato, onion and cheese rather then a cheesy-potato and onion.... if that makes any sense at all!

Next comes the dough. Honestly mix the wet ingredients together and slowly add in the flour until it forms a dough. Knead it until everything is just incorporated; the dough should be smooth and a little sticky. Wrap it in plastic wrap and allow it to chill out in the fridge for 20 - 30 minutes. This will allow it to rest, very important; and give your filling a chance to cool down before you handle it.

Once everything is nice and rested, take the dough out and beat the heck out of it! Just kidding, you will need to roll it out though. You may want to roll it out and then use a cutter to make them all nice and perfect but not me! I divided the dough into 8 equal sections and then continued to divide until they were the size that I liked. I like big rustic looking pierogi and made them as such. Here's a peek:

Looks like they are ready for a soak in a pot of boiling water. Once they float to the top allow them to cook for another 2 - 4 minutes depending on how large yours are. From here I plop them down into a hot skillet with butter and let them get nice and crispy. Top with additional sauteed onions and a little sour cream and you are ready for a CCC! Enjoy!

These fed two of us for 2 dinners and I wish I had've made more to put in the freezer. Don't be scared to double or even triple a batch!


YUM!

Dulce De Leche Liqueur

In the last post I showed you how the Dulce De Leche caramel complimented a cappuccino cheesecake so I decided to keep going on that theme. I created a Mexican version of an Irish classic.

Here we have Mexican Cream! A Dulce de Leche Liqueur.

It was really simple too! And can be enjoyed in Coffee or as we did as shots at a Cinco de Mayo celebration. All you need to do is get out your blender and add 1 can of Dulce de Leche, 1 cup of cream, and 1/2 cup - 1 cup of Rum. I know you are thinking it should be Tequila, and if you want go right ahead, I just prefer my Tequila straight up,  I don't like to mix it with anything other then lime juice! If that! Blend this until it is combined. I would also suggest that you start with 1/2 Cup of Rum, give it a taste and add more to suite your tastes. I like it sweet and creamy, and I ended up starting off with lots of Rum and I had to keep adding cream and caramel until I like the way it taste. I suggest you do it the other way around!

Creamy Cappuccino Cheesecake

This is serious YUM! I know I've been on a bit of a sweet kick lately which is a little unlike me, I do love sweets but usually me and my sweet can't get through a whole cake or pie etc. But let me tell you, this cheesecake did not last long around our house!

And its no wonder why just look at this delicious confection!


Lets get just a little closer!

  Is that? Did she really? No she didn't! 
Oh Yes! I did! That is Dulce de Leche swirled about!

Here is the recipe

Crust
  • 20 graham cracker cookies, crushed
  • 5 tbsp melted butter
  • 1/4 cup sugar
  • 2 tbsp cocoa powder
  • 1 tbsp espresso powder
Filling
  • 1/2 cup whipping cream
  • 4 teaspoons espresso powder powder
  • 1 1/2 teaspoons vanilla 
  • 3 tbsp Kahlua
  • 4 8-ounce packages cream cheese, room temperature
  • 1 1/4 cups sugar
  • 4 large eggs
  • 2 tablespoons flour
  • 1 can dulce de leche
Dulce de Leche
  •  1 can of sweetened condensed milk

First start by making the Dulce de leche by cracking the can slightly open and  adding it to a small pot with water about 2/3 of the way up.

Bring to a boil and let it go for about 1 & 1/2 hours. You will need to top up the water as it will evaporate so keep an eye on it. Let it cool, crack the lid the rest of the way off and Voila!
Dulce de Leche! You can use this in soo many ways, as simply as dipping apple wedges into it for a caramel apple treat or for a Mexican Baileys liqueur that I will show you soon, or for our purposes the fabulous surprise in a cappuccino cheesecake. This will give the Starbucks Carmel Frap a run for its money!

So anyways....
Mix all of the ingredients for the crust together, grab a handful and make sure that it is sticking together, it should hold its shape, but it is ok if it cracks a little, as long as you know it is going to hold together. Spread evenly into the bottom and sides of a spring form pan (This is a Must for cheesecake making!) And bake in a 350 degree oven for 10 minutes. Allow to cool while you get onto the filling. Because we all know that a crust is nothing without its filling!

Now onto the creamy goodness:
In a small bowl combine the cream, vanilla, Kahlua and espresso powder. This will help to distribute the espresso powder evenly. I wanted to see the flecks and it is ground so finely that they don't create any sort of textural difference, just add a visual affect, plus you know me! I like the real thing! No instant powders for moi! In a separate and I advise a quite large bowl beat the cream cheese until it is fluffy, incorporate the sugar and then add the eggs one at a time. Slowly add the flour, then add in the cream and Kahlua mixture. Combine until it is one big mess of goodness and slowly pour into the crust.
Remember the dulce de leche? How could you forget, pour it into a swirl around the pan if you can. (If it is warm it should pour alright, I had to use a spoon to coerce it, then the heat had its way with it so it turned out as you saw in the picture above.
Bake for about 1 hour or until the sides start to pull away and the top is brown. If you can avoid it cracking let me know your trick!

Also I added a pan of water in the bottom of the oven to create moisture, I'm sure I just left it in a little to long and that is why it cracked, it did turn out to be very golden! perhaps a little too golden.... whoops... it was still oh so good!

Kale Chips

I had planned a yummy Cinco de Mayo post... but was to late, and while I will share with you the most delicious fish tacos right now I must share something else.

What is is that I am so amazed by...

Kale Chips!

I know! I thought 'Oh, those would make a really good healthy snack' and by healthy I was meaning 'not that great' but honestly I can't make these things fast enough. I made one bunch and had eaten the whole thing before I even took a picture. Then I made a second bunch and I had enough time to take a few pictures, but then I ate them all! I ate 2 bunches of Kale and thought 'wow what a good way to get your greens'


They do wilt down a little, but they get so crispy! And that deep green flavor adds something that a regular potato chip just can't compare too, while being so subtle and satisfying. I have seen these fluttering about the Internet for some time, and now I only wish that I had have tried them right away!

Here's the directions:

Cut the inner stems out of a bunch of Kale and cut them into chip size pieces. Wash and dry well. Lay the pieces on a baking sheet evenly. Drizzle with Olive Oil and sprinkle with Salt and Pepper. Massage it all into the little crevices and then make sure it is laid out evenly (They will get crisper if they are not touching). I baked these in the oven for about 20 minutes. It all depends on the size of the chips so keep an eye on them. You want them to get crisp without being to brown.

I think I will try them out in the dehydrator to preserve nutrients.... but honestly I ate them so fast it might take to long!

Mango Pudding


My grandmother make the best Mango Pudding!
I think it is all the years or trial and error that make grandmothers so good at cooking. My boyfriend says I am a good cook... but not better then his Mom, which I don't take offense to because we cook very differently. She makes homey classics that warm you from the inside out and I love to experiment and use weird ingredients, and make things a little healthy... well most of the time anyways. I will share the most amazing chicken wings with you soon, that are so good to the taste-buds, but so hard on the heart!

Anyways back to my Grandma, my mom is a fantastic cook, but my Grandma makes certain things that are just irresistible! Like her potato salad, her baked ham, her ribs, her pickled beets, and her mango pudding. Those are my faves. I didn't call her to ask her the recipe when I had a craving, I went online. I only ask for recipes when I am with her so I can have the full demo; except the first time I cooked a turkey, I was 697 kms away and I certainly needed her advice then! But for the Mango pudding recipe I will probably wait until the next time I see her which hopefully will be soon. She is only a ferry trip away!

And ask her I will because this mango pudding did hit the spot, but wasn't quite what I remembered in my grandma's version. I just followed the recipe from here and it was pretty good but I already have a few tweaks in mind, and I can't wait to see what my grandma does! I'll be sure to keep you updated.

And just so you know Mango Pudding is dreamy! Its creamy and oh so mango-y and refreshing. A near perfect fruit dessert that will leave you feeling satisfied and light at the same time!

You will see more of me soon!

Thank you for your patience! I know I vanished for a while! It has been this moving and a new job and my camera broke! I will be getting it back all spiffed up early next week so I will share a new creation in my new kitchen with you then!

In the mean time

THANK YOU!
And here are some of my homeless pics:


Since moving into the new house I have bought a new cutting board! After the marks I left on those counters and my darn kitties climbing up the curtains I didn't even bother asking for my deposit back! I am happy to report that we are all changing our ways now though! I have a new bamboo cutting board and they have a spray bottle for when they are bad.... they are learning too!


I'm sure you can guess that I was making Greek Salad, such pretty colors, but a pretty universal recipe.

Spanakopita Asparagus Rolls Ups

I love to roll my food up. There is just something so satisfying about being able to put everything together and create a perfect bite.

These guys were just that! Perfect bites, go on check 'em out!


This was the love child of my making spanakopitas for my lunches and my making sushi for dinner. I had been making veggie sushi for a quick dinner (which didn't turn out all that pretty, and didn't have a lot of time to be photographed as it went directly into my mouth after a particularity long day at work! But as I had some extra phyllo sheets I decided to turn up the creativity a little on a long time classic.

My spanakopita filling is very simple:

I use
1 package of frozen spinach (my grocery store now sells the frozen spinach in a bag, frozen into little 'pellets' of spinach - it thaws a lot faster and the package has a little more then the traditional box, I would think you may need about 2 boxes)
1 container (250 gs I think) of feta
2 eggs
nice big pinches of salt, pepper and nutmeg (mmmm.... nutmeg!)
about 1/4 c toasted pine nuts

You will also need:
Phyllo dough, melted butter and asparagus spears.

I just mix this all up until it is to my liking, sometimes I add more cheese, sometimes less, just do whatever you like, its not like the spanakopita police are going to come and get you!!

Begin by laying out one sheet of phyllo, brush with butter and add another sheet on top, brush the second sheet with butter and then cut the sheet in half, place one half on top of another so that there are 4 sheets stacked together.

I added two lightly steamed asparagus spears facing opposite directions so that the tips were just poking out for presentation and then topped it with a little of he filling, really just enough to hold it together; it should be about the crunchy asparagus. I rolled it up and put it on a baking sheet brushing with additional butter. Bake at about 375 until the tops are brown and the dough is crispy. (About 10 - 15 minutes) Let cool slightly before serving.

These would make a fantastic appetizer or snack. They are certainly elegant enough to serve to guests! (And fairly friendly on the pocket as you can really make the ingredients stretch!)

In memory of a great friend


Can't believe it has almost been a year. Right before he left that night we were all talking about random things. I told him what I thought of the 'Glass half empty or glass half full' question. I said that If you begin with an empty glass and you fill it up half way then your glass is half full, if however; your glass is full and you drink it half way down, then your glass is half empty... he said 'That is so smart! You should put that on the internet'
So here is to you Jonathan!

Your friendship will always have a special place in my heart.

Sweet and Sour Veggie Ribbon Salad

I set out to make a simple salad using up a couple of veggie that I had in my fridge and was absolutely blown away by its simplicity, freshness and vibrant flavour. Honestly there is as much flavor in these carrots and zucchini as there is color! Lets have a look:


And an even closer look:


All that I did was use my vegetable peeler to make ribbons of carrots and zucchini, I added some chopped green onions and then came the magic!

I added a third of a cup of rice wine vinegar to a small saucepan with a couple of table spoons of sugar (the same ratio as you would for making sushi rice) 1/3 cup rice vinegar, 3 tbsp white sugar and warm until the sugar melts, I poured some of that over the veggies and added some fresh cracked black pepper and a small drizzle of soy sauce and it was so surprisingly yummy!

I also have some great news! I am moving into a new house! With a real Kitchen! I can't wait to share the creations I make in there with you! I am so excited right now, I have a great new job, am getting a whole house with a yard for less rent then my current 1 bedroom apartment! (Its in a small town not in the city, but this small town is my home and right on a big beautiful lake!) and I just feel that this whole year is going to be fantastic!

I hope that this year is shaping up excellently for you too!

PS : Seriously try this when you are in a rush, or just feel like something light!

Stuffed Pretzel Bites

I know... I have been a very baaaa -ad blogger. I offer you my sincere apologies, I have just began a new job and it has taken over my existence. It is am amazing opportunity for me though and I am so very excited! It is all mellowing out though, all becoming 'normal' it is just a much longer commute, but I have made a few tasty treats that I would like to share with you.

Today it will be these stuffed pretzel bites!
These little suckers disappeared within minutes!
Make them right now!
I promise you will not be disappointed!

Just Look:


My goodness! As far as Savories go, it just doesn't get any better then this.

So anyways I will just get on with the recipe because that's what you really want
Trust me!

1 package of instant yeast
2 Tablespoons packed brown sugar
1 1/4 cup warm milk
2 1/2 to 3 cups flour
6 cups water
4 teaspoons baking soda
4 Tablespoons unsalted butter, melted
1-2 Tablespoons coarse salt
Fillings of your choice!
Slowly heat the milk until it is warm to the touch but not boiling and add the brown sugar.
Add 2 1/2 cups flour and the package of Yeast to the milk. Stir with a wooden spoon until a soft dough forms. Add the remaining flour if you need to. Turn the dough out onto a lightly floured surface and gently knead a few times, form it into a ball and add the ball to a clean lightly oiled bowl. Cover with Plastic wrap and all to rise in a warm area for about 2 hours or until it doubles in size. The waiting really is the worst part! But in this case it is so worth it!
You will know it is ready when there are bubbles on the top and it is all big and puffy!
Turn out the dough onto a lightly floured surface. Divide into 4 equal pieces. Lightly dust your hands and rolling pin with flour. Roll one of the four sections into a 12×4-inch rectangle. Fill the bottom 1/3 with the filling of your choice. I decided to do a few different ones including ham and cheese, cheese and caramelized onion, ham, cheddar and mustard and some of the last with Dijon mustard. Mmmmm... mustard! Roll it into a log and then cut into one inch pieces. Into nice little bites!
Boil up 6 cups of water in a pot and add the baking soda. Reduce heat to a gentle simmer. Boil pretzels in batches, cooking about 20 seconds each, making sure they are flipped. You will see them get all nice and puffy, and I've got to tell you I was worried about the cheese during this step, but if you are sure to leave them in for no more then 30 sec. your cheese will be fine!
Bake in a 400 degree oven for about 15 minutes or until they resemble little golden gods that you must eat immediately.
Careful they are hot! and you must not forget this last delicious step:
Brush them with melted butter until they glisten and top with nice crusty chunks of salt.
I hope these tasty treats make up for my time away!!

Pour me a tall glass of Almond Milk

I have began a brand new job that I am really excited about, but it involves a bit of a commute and I am now coming home 2 hours later. This week a I made a big pot of beans and rice so I don't have to much to share with you. Well, to say not much is actually an understatement.

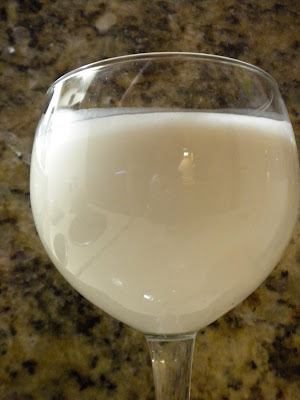
I have a tall glass of creamy and sweet almond milk to share with you.


I am trying to get away from Dairy and while I haven't yet tried to use this for anything other then drinking. But my oh my is it a tasty drink! I have really been enjoying it almost as an energy drink. It is full of calcium and protein but more importantly is creamy and sweet.
I love things that are creamy and sweet.

The recipe is simple:

2 cups of almonds
4 cups of water
A big squeeze of honey

Soak the almonds in water for a few hours. I usually do this over night then rinse them really well, they do get kind of slimy so rinse them until they are nice and clean and put them in a blender with the water and a squeeze of honey. Blitz in the blender for a few minutes until the almonds are finely ground. Give it a taste and see if it is sweet enough for your liking. Adjust accordingly. You can also use maple syrup, agave, you could even dissolve the sugar in some of the water. I happen to love honey so I use it as often as I can.

I have even bee washing my face with it.... but I think that will have to be another post!

Once it has whizzed up and all become friendly strain it through a nut milk bag or cheese cloth and enjoy!

Some people like it un-strained and thick - I am not one of those people but if you are, I won't hold it against you!

Smashed Potatoes

Hello All! I have a tasty side for you today.
I've made these many times in the past and now I have finally taken pictures so that I can share them with you all! They are pretty simple and you need only a few ingredients. I would say that they are also something that has a bit of a wow factor.

Have a look at these:


A little soft and little crispy; they are very unsuspecting. Sometimes the simplest things really are the best. And all you need to do here is choose a bunch of baby potatoes. I used red and Yukon golds for a little variety. Dump them into the hot tub and boil until they are fully cooked and fork tender. Drain and dump them onto a baking sheet. Now comes the fun part, time to let out a little of your aggression with a potato masher! Well.. not to much aggression because you will just want to gently smash the potato to look like the one above. Next drizzle with olive oil and sprinkle generously with salt and pepper. Toss in a 350 - 400 degree oven until they are crispy!

By increasing the surface area and exposing some of the fleshy inside you really get a lot of crunch while still keeping the soft and fluffy innards of a boiled potato. It would be a great addition to a roast chicken meal. So unsuspectingly delicious.

Fennel and Beet Juice

I thought I would include another juice recipe as January is a great time to cleanse and detoxify after a long season of eating what we please! I made this juice this morning as I have been feeling a little sluggish. By giving yourself; particularly your digestive system a break, it helps to give you a great boost and leaves you feeling light. Plus look at how pretty this one is:


It was so simple and refreshing! Also the fennel is really great for digestion and particularly for upset tummys.

I juiced:

2 bulbs of fennel
1 apple
1 beet

(The fennel bulbs I used were pretty small so if yours was large I would just use one) This juice is primarily fennel which gives it a beautiful licorice flavor with just a bit of sweetness from an apple and a bit of earthiness and color from the fennel. Yum!

Bacon Wrapped Cod

First things first: Happy New Year!
Now onto the goods...

These tasty bites are a little bit of heaven!


Just look at them!

They were actually inspired by an appetizer that I had at a Christmas Eve party that I went to. A friend of mine always has an appy and drinks party of Christmas Eve and it is always a lot of fun. Over the holidays there are always so many parties to attend and everyone is always trying to feed you but a lot of people go for the convenience of pre-made appies and that just doesn't fly with me. Sure they are convenient and a lot of them taste not so bad, but Donna always outdoes herself with a beautiful spread of homemade spanikopita, wontons, dips, spreads, meatballs, pizza bites and this year a little bundle that consisted of a piece of chicken and a water chesnut marinated in ginger, garlic and soy and wrapped in bacon. I decided to seafoodize that tasty little bundle that was gone off the table in mere minutes!

I simply took two fillet of cod and added it to a bowl with some lime zest, ginger and garlic all of which a grated with my new microplane that I got for Christmas. Thanks Mom! I added a bit of pepper and left it in the fringe overnight. Then I just chopped it into bites and wrapped each bit with bacon and secured with a toothpick. Pop those suckers into a 400 degree oven until the bacon is crisp and you have one tasty treat on your hands!!

I would suggest the bites be on the bigger side as not to dry out the fish but if you wish to substitute any other protein, I love scallops, or chicken, even beef would probably be pretty good.